twd ~ Nutty, Chocolately, Swirly, Sour Cream Cake

This week's post is chosen by Jennifer of Cooking for Comfort.

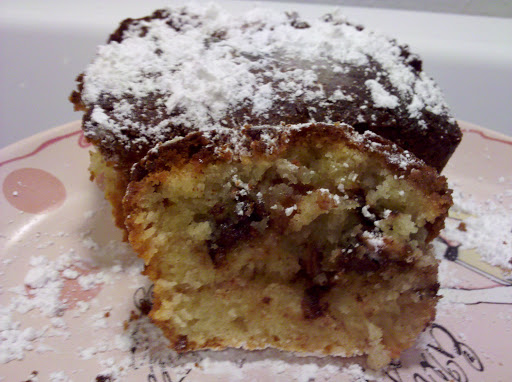
This cake knocked my socks off! It was a very pleasant surprise.

The name intrigued me, but also made me a little wary. Nutty, chocolately, swirly, and sour cream all in a bundt cake? Sounded high maintenance. But it turned to be very simple.

I substituted yogurt for the sour cream, and went heavy on the swirl spices, nuts, and chocolate chips that get layered in the batter. I quartered the recipe and baked it in a mini loaf pan. It was the perfect amount.

It smells lovely baking! Not just normal baking good, but licking the air good. It's an incredibly moist cake with a nice crispy top. I put in two layers of swirl. Perhaps I was being dense tonight, but I didn't quite understand Dorie's directions for making an indentation in the batter with the back of a spoon in the middle of the bundt cake pan...don't bundt cake pans have a hollow center? So I just did two layers - simple and it got the job done.

twd ~ Tangerine Muffins

Thanks to Betsy of A Cup of Sweetness for this week's TWD pick. I was happy to see the muffins on the list amid all the chocolate cookies and cakes this month. It's nice to have something a little different.


Keeping with that thought, I took a few liberities with the recipe. I used tangerines instead of lemons because 1) that's what I had and 2) I was curious how they would turn out. My grandmother gave me a loaf of Lemon Poppyseed Bread at Christmas that is still sitting in the fridge. I also didn't use poppy seeds at all. I didn't want to buy them because I simply don't understand them. My mom LOVES poppy seedy things - bagles and muffins and breads. She loves poppy seeds. But to me, they don't have much taste, look like little dead bugs, and get stuck in people's teeth.


So no seeds - except those in the raspberry jam that I used to fill the center of each muffin. On top, lots and lots of sugar + tangerine juice drizzle! Putting it on reminded me of making Pilsbury Orange Danish rolls as a kid. Only, these are much better. They are more like little cakes than hearty muffins. Really good.

Onion and Mushroom White Pizza

The other day I stopped by Smitten Kitchen, and saw her pizza with onion, bacon, and cream. It put homemade pizza in my mind. My plan was to use store bought pizza dough because it's easier and I was already hungry on my way home tonight. When I didn't find any there, I decided to wing it.

I combined white flour and whole wheat flour (two heaping serving spoons of each), added a pinch of salt and a half-spoonful of baking powder (aw, my precise measurements) and combined. Then I added water until it came together in a dough. I kneaded it a few times, rolled it out, and put it on the pan to rest.

Then I combined equal amounts of ricotta cheese and...ahem...french onion dip. The original recipe calls for sour cream, which I didn't have. Then I added salt and pepper and stired until nice and creamy. This mixture gets spread onto the dough.


Next, I sauteed one small onion, two cloves of garlic, and some portabella mushroom slices in olive oil until the onions caramelized. These get placed on top of the cheesy mixture. Then the pizza goes in a 400 degree oven for 12-15 minutes. This was very good with a glass of Malbec! Enough for two, but of course I finished off most of it myself.

SunO Dessert


I first heard about SunO from Scoutmob. I'll skip over how much I love Scoutmob, and say that the write-up intrigued me. Shaved ice made from condensed milk...what? I don't know about ya'll, but it sounded very good to me!

Turns out, SunO is on my way home from work, now that my office moved in mid-December. I pass it everyday! Tonight, even though Atlanta has had more than it's fair share of snow and freezing temps this week, I was craving a frozen treat - ice cream, froyo, the real tangy frozen yogurt...something. So I decided to stop at SunO and give it a try.

At first, I was a little overwhelmed with all the pretty menu choices: wheel pies, crepes, custards, bubble teas, powders, caramels, syrups, red beans - the list goes on of all the things to mix and match to make your own creation. It being way too cold outside, I wasn't too surprised to be the only one there, but I didn't want to stand and stare blankly at the menu too long. I sampled the mango, which was a little odd to me, but I know I can be picky with fruity dessert. So I went with the plain chocolate and it was great! The small was $1, and I had to ask the cashier twice "how much? really?" When has any good ice cream been a dollar? Wow. That makes it even more dangerous as a potential stop-off after work; it's good and it's cheap.

It's also very light and fluffy, which makes me feel like it's not as bad for me as regular ice cream. The consistency did take a second to get used to, but I thoroughly enjoyed it. Next time, I might have to go for one of the fancy ones with cookie crumbles.

Great American Cookie Snickerdoodles


Today I ran the Red Nose Half Marathon with two wonderful friends. It was a first for one of them and she totally rocked it! I'm so proud.

A plus to this race is that it takes place in my hometown, so I got to spend a little time with my sweet mom. She made Snickerdoodles for after the race, and they came out perfectly! Soft and chewy. She used a recipe that I pulled off the internet 10+ years ago when I was in high school. It makes the best Snickerdoodles I've had yet, and is based on a recipe from the Great American Cookie place.

Snickerdoodles
makes 16-18 cookies

1/2 cup butter (1 stick), softened
1/2 cup granulated sugar
1/3 cup brown sugar
1 egg
1/2 tsp vanilla
1 1/2 cup flour
1/4 tsp salt
1/2 tsp baking soda
1/4 tsp cream of tartar

2 Tbsp sugar
1 tsp cinnamon

1) Cream the butter and sugars on high
2) Add egg and vanilla, and beat until smooth
3) Combine flour, salt, baking sod, and cream of tartar in another bowl
4) Pour dry into wet ingredients and mix well
5) Preheat over to 300 degrees
6) Refrigerate the dough for 30-60 minutes
7) Combine sugar and cinnamon in a small bowl
8) Take 2 1/2 Tbsp of dough and roll into ball
9) Roll in sugar and cinnamon mixture
10) Bake 12-14 minutes

Happy New Year! twd ~ Midnight Crackles

Thanks to Laurie of Slush and Jules of Someone’s In the Kitchen who chose Midnight Crackles for the anniversary recipe. TWD is three years old and still going strong! Thanks to Laurie for starting it, and to everyone whose comments and blog posts have made this a wonderful experience for me. Bring it on 2011!

Now to the recipe. I'm very curious to see how these turned out for everyone else. Mine came out rather cake-like - very thick for a cookie and not at all chewy or crispy. I made the dough before Christmas, and put it in the freezer for a few days. When I took it out to bake, the dough was very hard, so hard there was no scooping or shaping involved. It was more breaking and beating into the semblance of a circle.

Baked up these are good, but there's something that makes me look at them askew. Are these little cakes in cookie clothing? I can't quite put my finger on it, but something is odd. I spiced these up, adding the "Playing Around" suggestions of ginger and coriander. Perhaps it's the ginger + chocolate combo that's throwing me off. I've still got dough in the freezer, so I'll play around with next batch, make them smaller and thinner and bake them less time.

For all those making resolutions - Good Luck!

Knit Coffee Sleeve

Tuesday is one of my dearest friend's birthday. We've known each other since Kindergarten; accompanied each other through elementary, the wider halls of middle school, the exciting times of high school, and even into the dorms at college. Everytime we get together there is so much to talk and laugh about that we usually end up having lunch for four hours, or closing down the coffee shop.

As a little gift, I made this coffee sleeve. She's a Starbucks fan. Seriously. She's there everyday, and even attended her favorite barista's wedding.

It's a simple horseshoe cable pattern with a knit border. This is my first cable work, and was surprisingly easy (and quick). Here's the pattern:

CO 20 sts
Row 1: k20
Row 2: k4, p12, k4
Row 3: k20
Row 4: k4, p12, k4
Row 5: k4, c6b*, c6f**, k4
Row 6: k4, p12, k4
Row 7: k20
Row 8: k4, p12, k4
Row 9: k20
Row 10: k4, p12, k4

Repeat 10 rows until you reach the desired size, i.e. the circumference of the cup. BO and stitch ends together.

*c6b = slip 3 sts to cable needle, hold to back, k3 then k3 from cable needle
**c6F = slip 3 sts to cable needle, hold to front, k3 then k3 from cable needle